Creating a Charter Job
For an overview of Charters refer to the relevant page
Looking for the aircraft-first workflow?
If you already have an aircraft and want to find demand for it, see Create Charter Mode - a Premium Core feature that lets you start with your aircraft, visualise the cabin with an interactive seat map, and create jobs in one streamlined flow.
Charter Jobs are one of the two primary ways passengers travel in FSCharter. Unlike scheduled Routes, charters involve flying passengers to their chosen destinations. This guide will walk you through the process of finding, routing, and creating jobs for these passengers.
Finding Demand
Your first step is to find passengers. This is done from the Operations Cockpit using the Demand lens. The dock will show departure and arrival search boxes, with the "Ready to depart" filter active by default.
This is the demand-first approach
You browse available passengers and then choose an aircraft later. If you'd prefer to start with a specific aircraft and find matching demand for it, use Create Charter Mode instead.

There are several ways to search for demand.
Search by a Single Airport (Departure or Arrival)
You can find all passengers departing from or arriving at a specific airport.
Enter an airport's ICAO code directly into the Departure or Arrival textbox. If you're unsure of the ICAO, click the binoculars icon to search for an airport by name or other criteria.
In this example, we'll search for demand departing EGCC (Manchester).
Click Search. The map will update to show all passenger groups wishing to depart from Manchester.
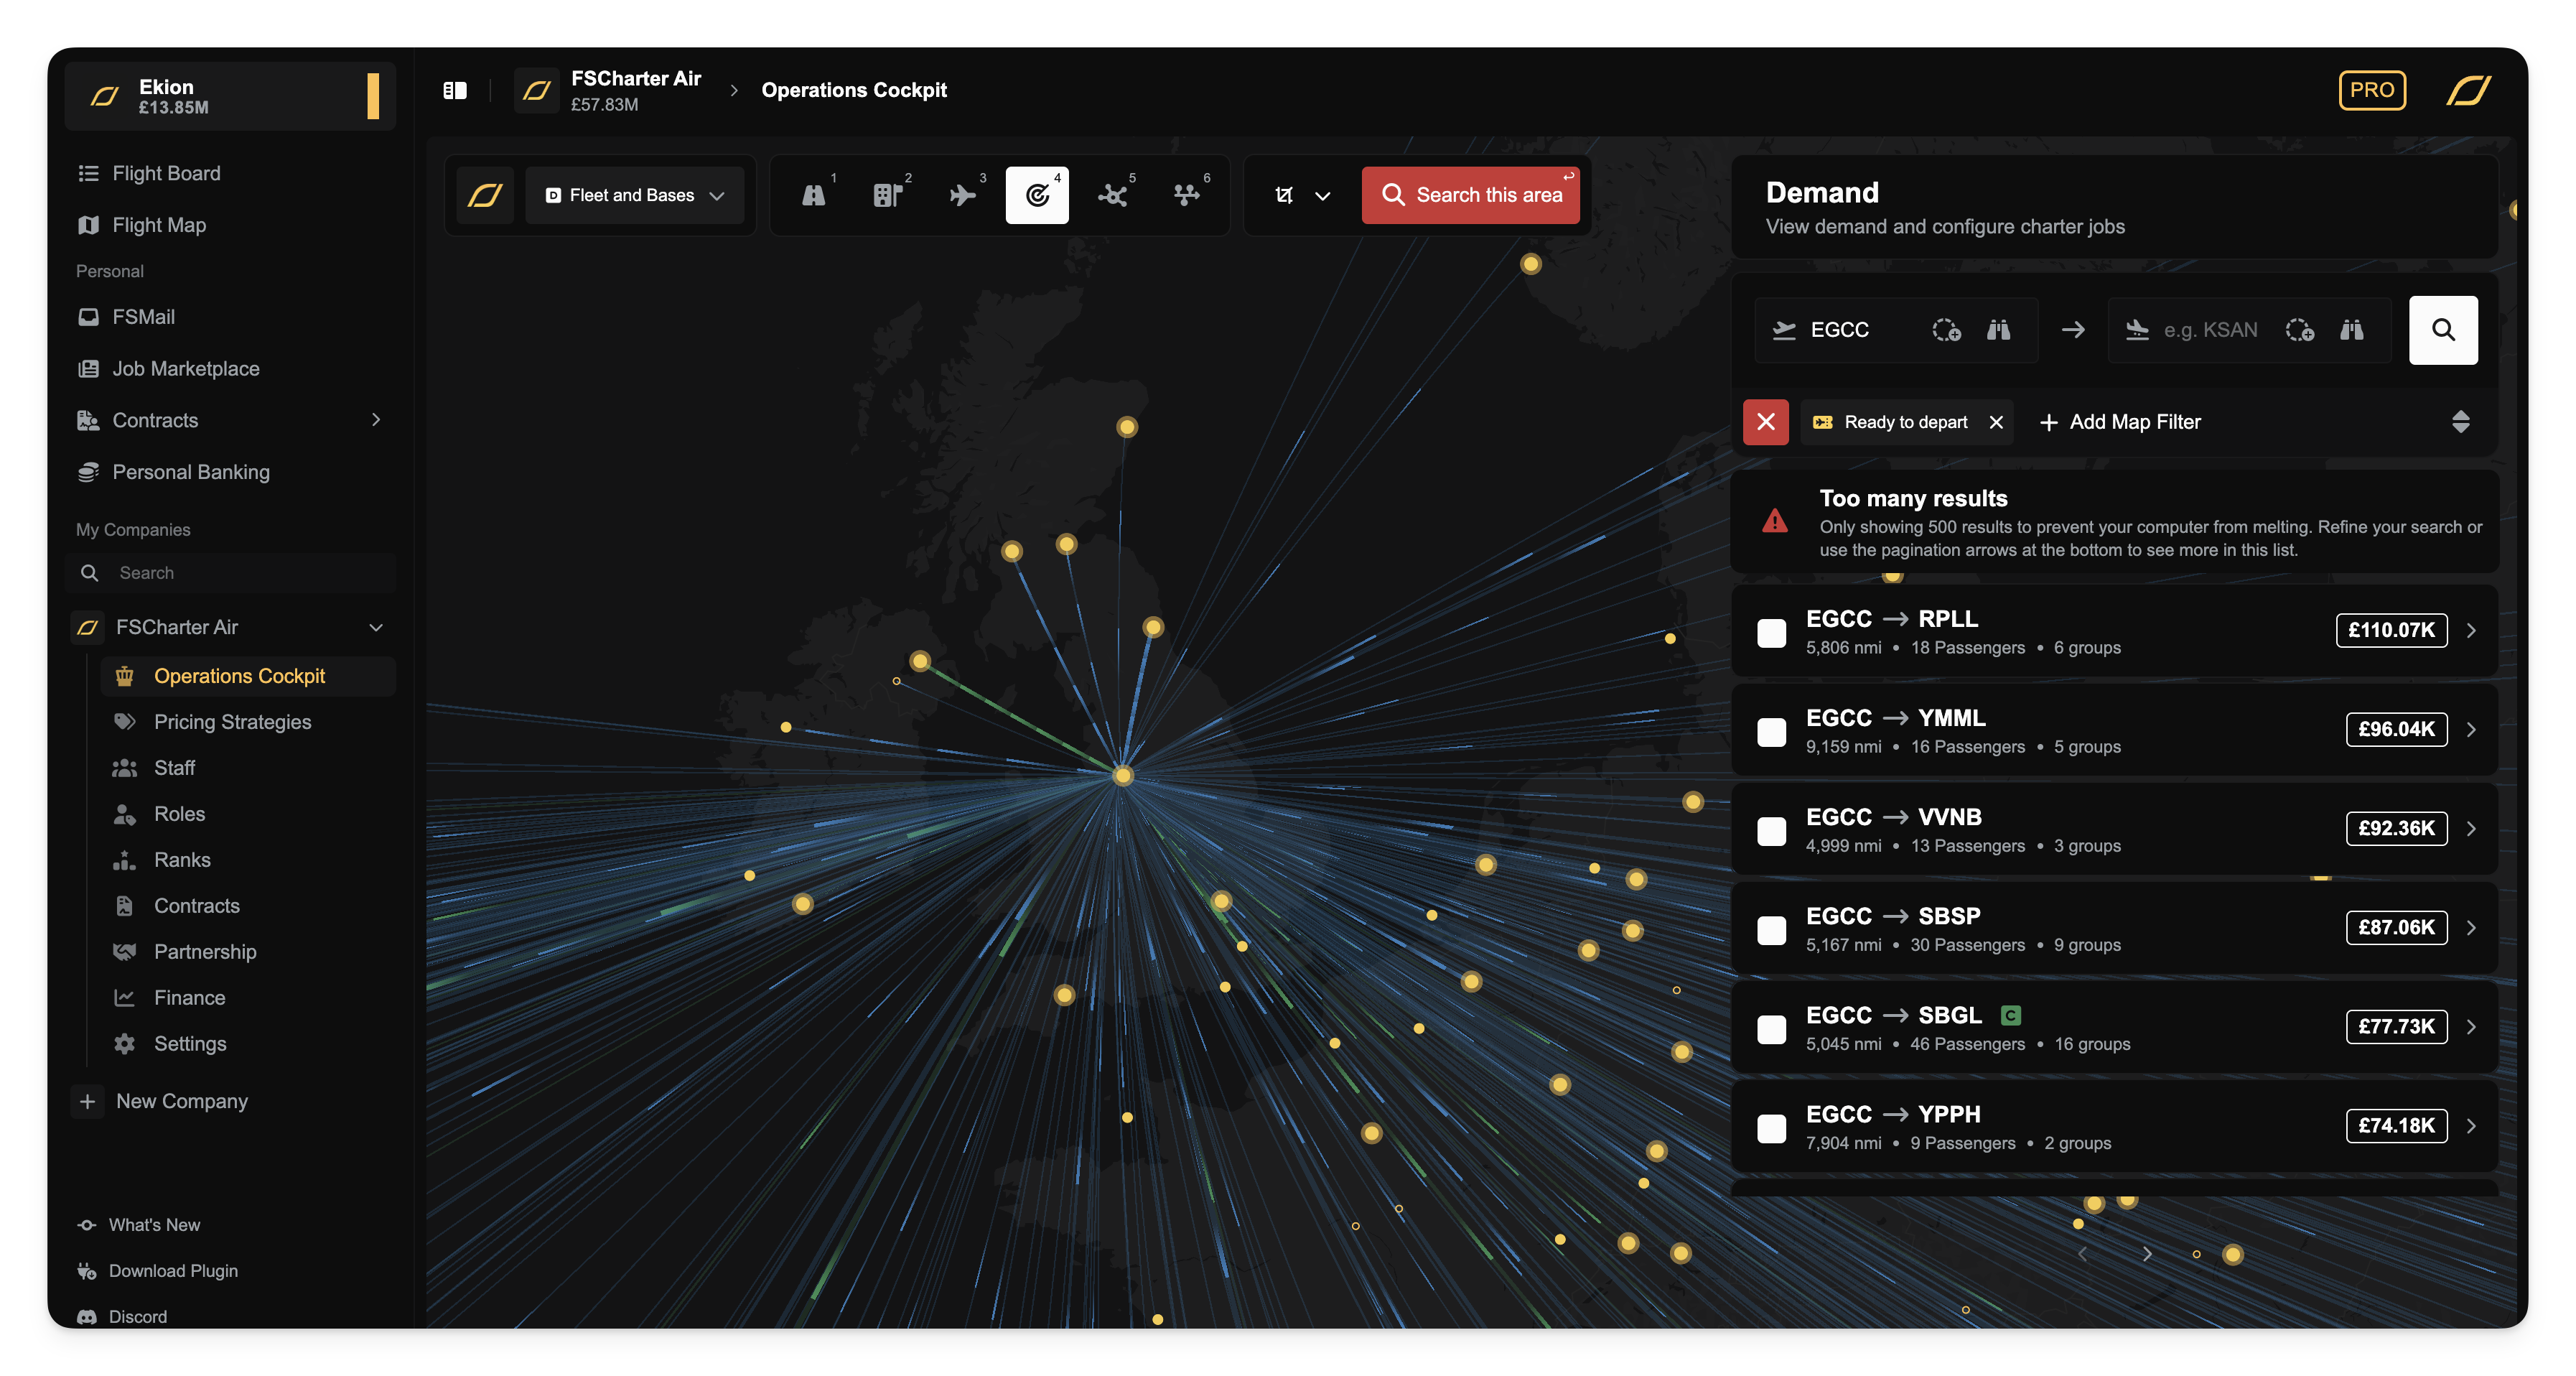
A large airport will have many results. You can use the filters to narrow them down by arrival country, payment, distance, and more.
You may see green lines on the map and rows in the dock marked with a green 'C'. This indicates collaborative demand (passengers delivered by another company who need transport to their final destination). You can track their journey by expanding the row and clicking the passport icon to view their travel history.
Let's filter our results for an airliner flight of roughly two hours. We'll set the distance filter to a minimum of 300 nm and a maximum of 500 nm. This significantly refines the list.
To select passengers for your charter, click the white checkbox on a row and choose Add All or Add Filtered. You can also expand a row to select individual groups. Be mindful that adding too many passengers may limit your aircraft choices later.
Search by Airport with a Radius
This method allows you to find passengers traveling to or from a general area, not just a single airport.
Enter an airport ICAO. In this example, we'll use EGPH (Edinburgh) as the arrival airport.
Click the circle icon between the text and the binoculars to add a radius. We'll set it to 50 nm.
Click Search. The map now displays all demand for destinations at EGPH and within a 50 nm radius around it.

Let's assume we want to fly this with a regional aircraft on a one-hour flight. We can filter for a maximum distance of 100 nm and a maximum of 30 passengers. From the filtered results, select the passenger groups you wish to fly as before.
Search by both Departure and Arrival Airport
You can also search for passengers on a specific city-pair. This works just like the previous methods, and you can add a radius to either the departure, arrival, or both airports.
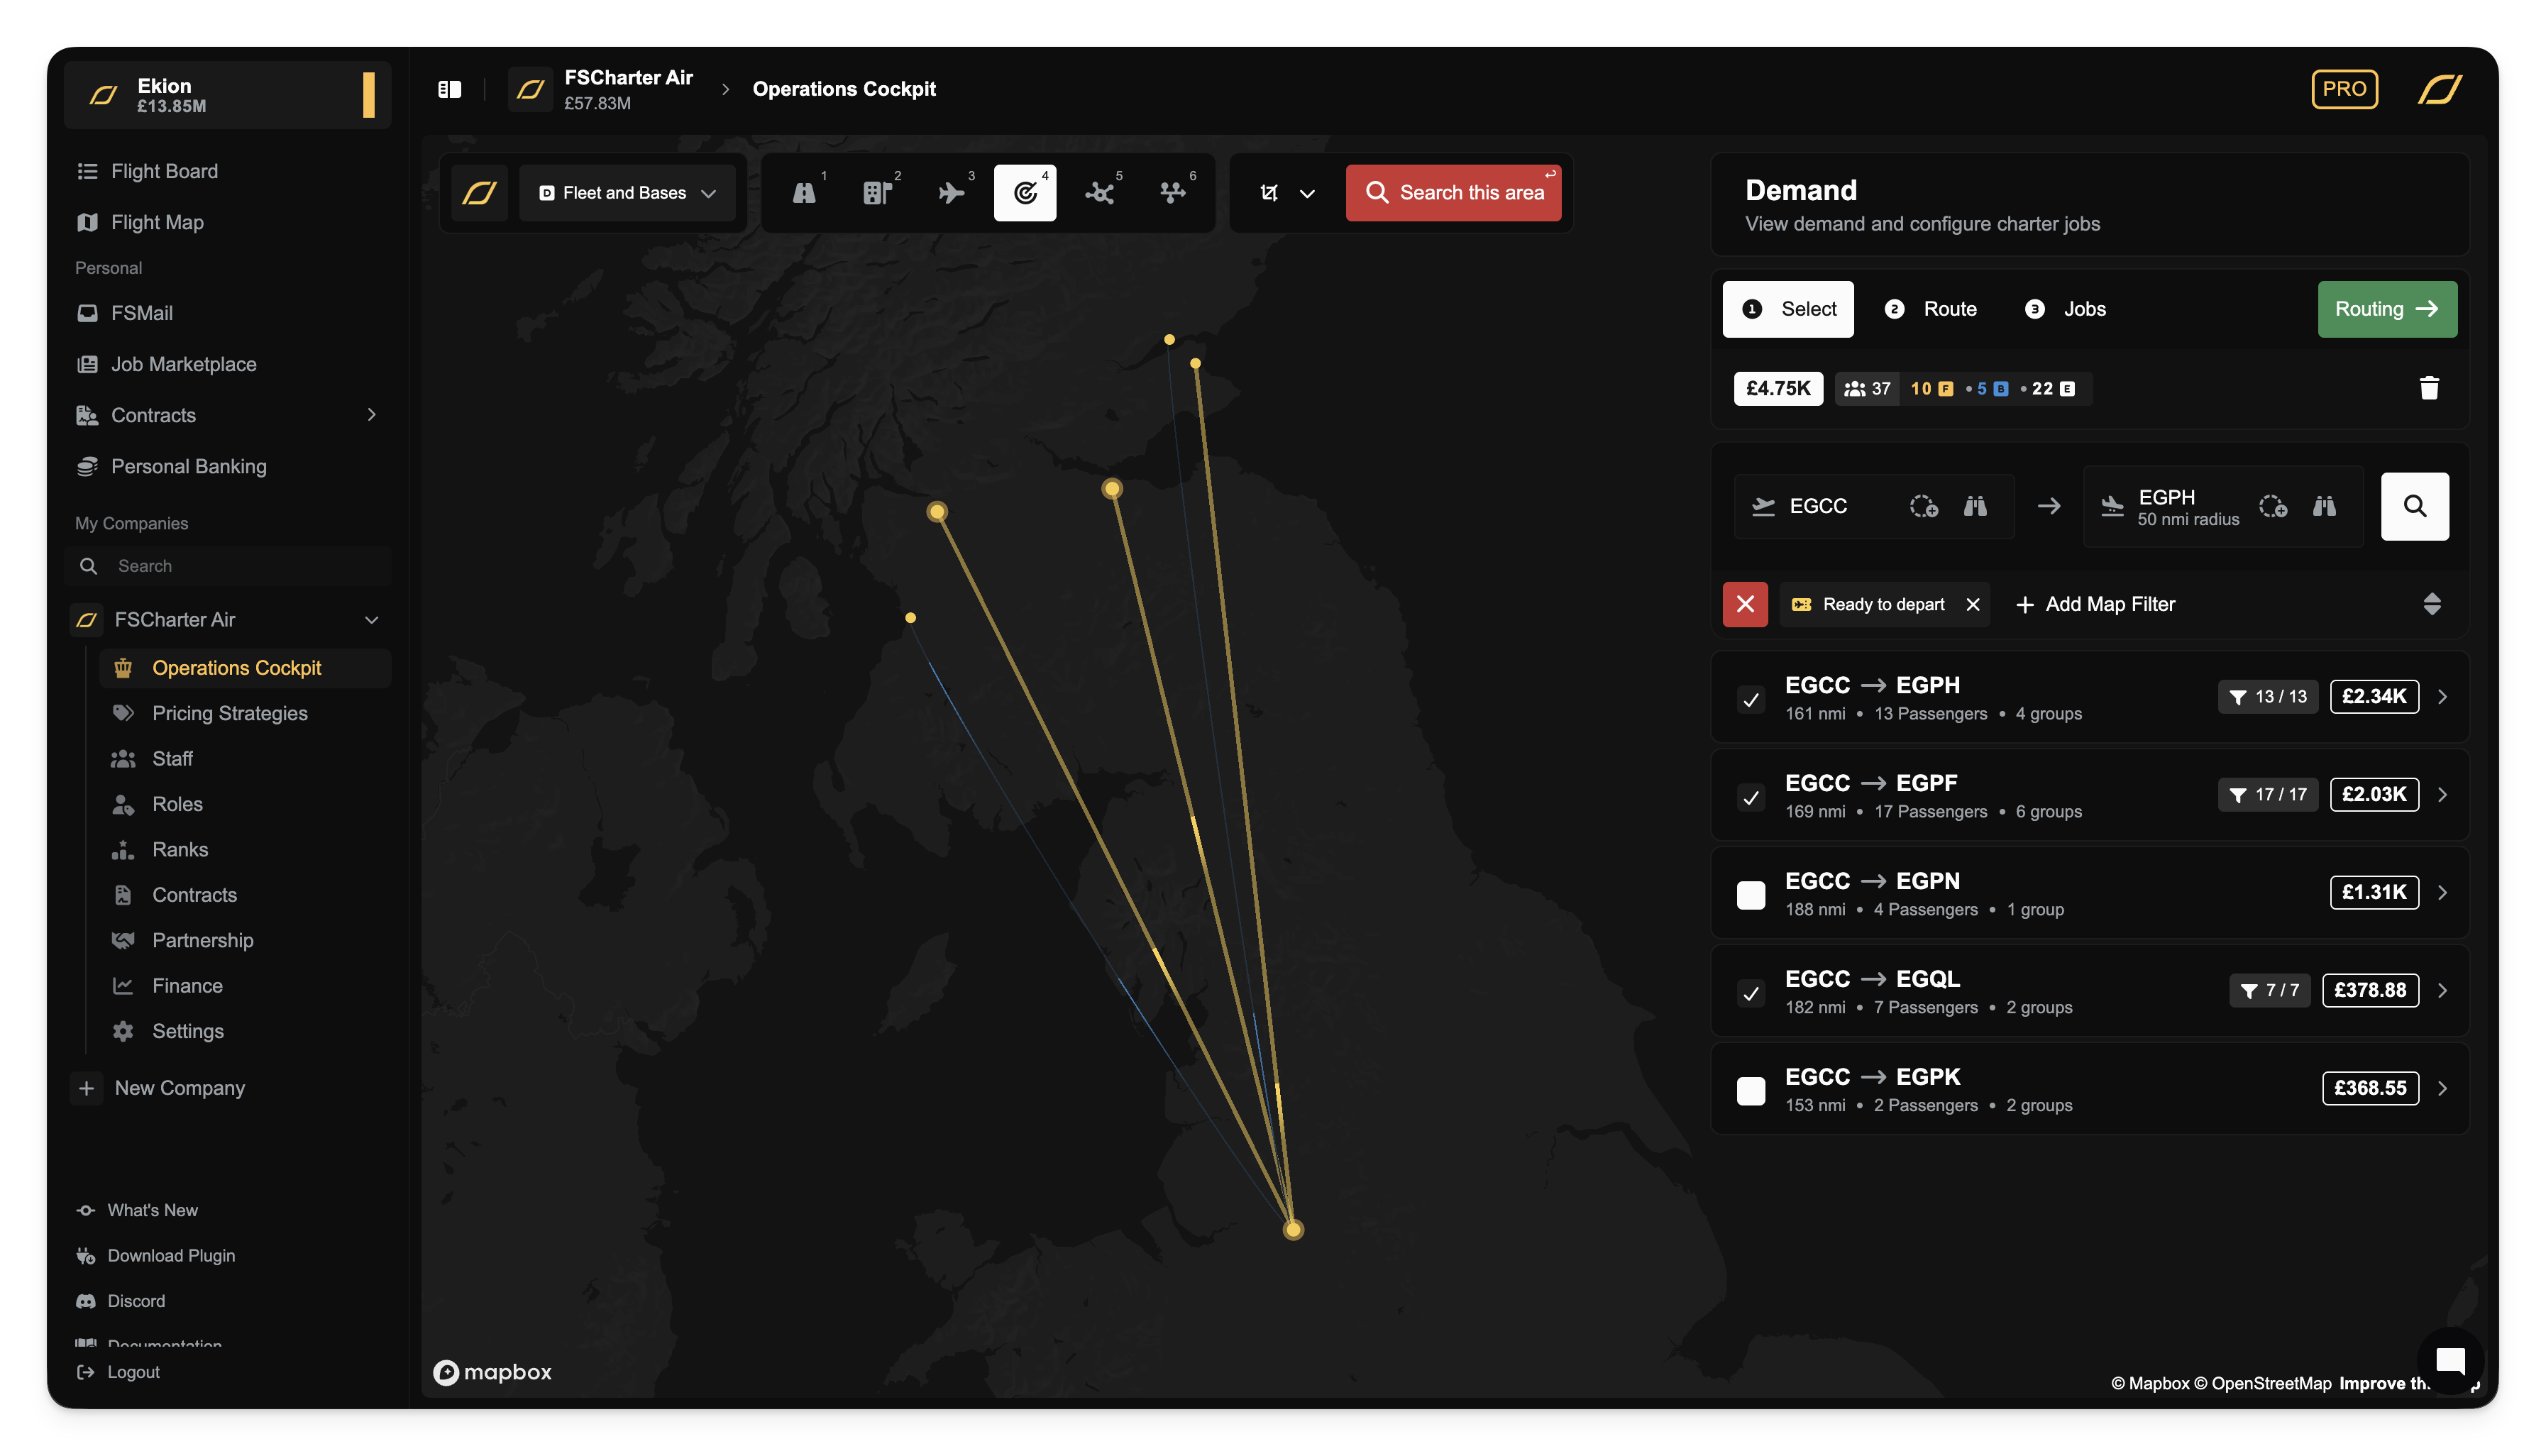
Let's search for demand from EGCC to EGPH with a 50 nm radius around EGPH. After applying our search, we can see the available passenger groups.
Selecting Demand
Once you've filtered the results, there are a few ways to add demand to your plan:
Select a Whole Group: The quickest way is to click the checkbox next to a passenger row in the dock. This will select all "Ready to depart" passengers in that group. Make sure to click
Add Visibleto ensure that only "Ready to depart" passengers are selected.

Select Individual Groups: To see the individual passenger groups within a row, click on the row itself (or its corresponding line on the map). The row will expand, allowing you to select specific groups using their checkboxes.
Select Directly from the Map: For a more visual approach, you can hold Ctrl (or Cmd on Mac) and click directly on the demand lines on the map to add them to your selection.
Once you are happy with your choice of passengers, press the green Routing button to move to the next step.
Planning the Charter Journey
After selecting your demand, you need to plan how you'll get everyone to their destination. This screen gives you the freedom to design the journey for each demand. The dock is now filled with the individual passenger groups you selected.
Let's use our demand from EGCC to the EGPH + 50nm area to demonstrate.
Routing Using Multiple Direct Flights
The simplest approach is to create direct flights for each group. In our example, this would be three separate flights: EGCC to EGPH, EGCC to EGPF, and EGCC to EGQL. If you prefer this method, you can proceed immediately by pressing the green Jobs button.
Routing Using a Central Hub Airport
You can fly all passengers to a central airport first, then arrange onward flights. For instance, we could fly everyone to EGPH and then operate smaller flights to EGPF and EGQL.
You can automate this common pattern by using the Route all via (Beginning) or Route all via (End) buttons located below the Jobs button. Select EGPH, and the map and passenger itineraries will update to show the stopover. Alternatively, you can achieve the same result by manually dragging the route lines on the map to snap to EGPH.
You can undo changes or customize routing for a specific group by expanding the passenger group in the dock and press the red bin icon next to any leg you wish to remove.
Creating a Chain Route
Another option is to create a multi-stop sequence, such as EGCC → EGPH → EGPF → EGQL. This can be done with the routing buttons, but it's often easiest to drag the lines on the map.
Adding a Stopover
You might want to add an intermediate stop, either to break up a long flight or to visit another city (possibly to collect or drop off demand). Let's see if there is any demand wanting to go from EGNT (Newcastle) to near EGPH and add them to our plan. Click back on the Select tab and perform a search from EGNT to EGPH. We see that there's a large demand of collaborative passengers wanting to go from EGNT to EGPH. Let's select the high-value first-class passengers and add them to our plan.
Now that they're part of our dispatch plan we need to add a stopover at EGNT before continuing to EGPH. Click back to the Route tab and either drag the route lines to EGNT on the map or use the routing buttons like before.
Once you are happy with the journey you've created, press the green Jobs button to proceed to the final step.
Creating Job(s)
This last tab, Jobs, is where you turn your planned journey into concrete jobs that pilots can fly. The screen now shows Unallocated Legs on the left, derived from the routing you designed.
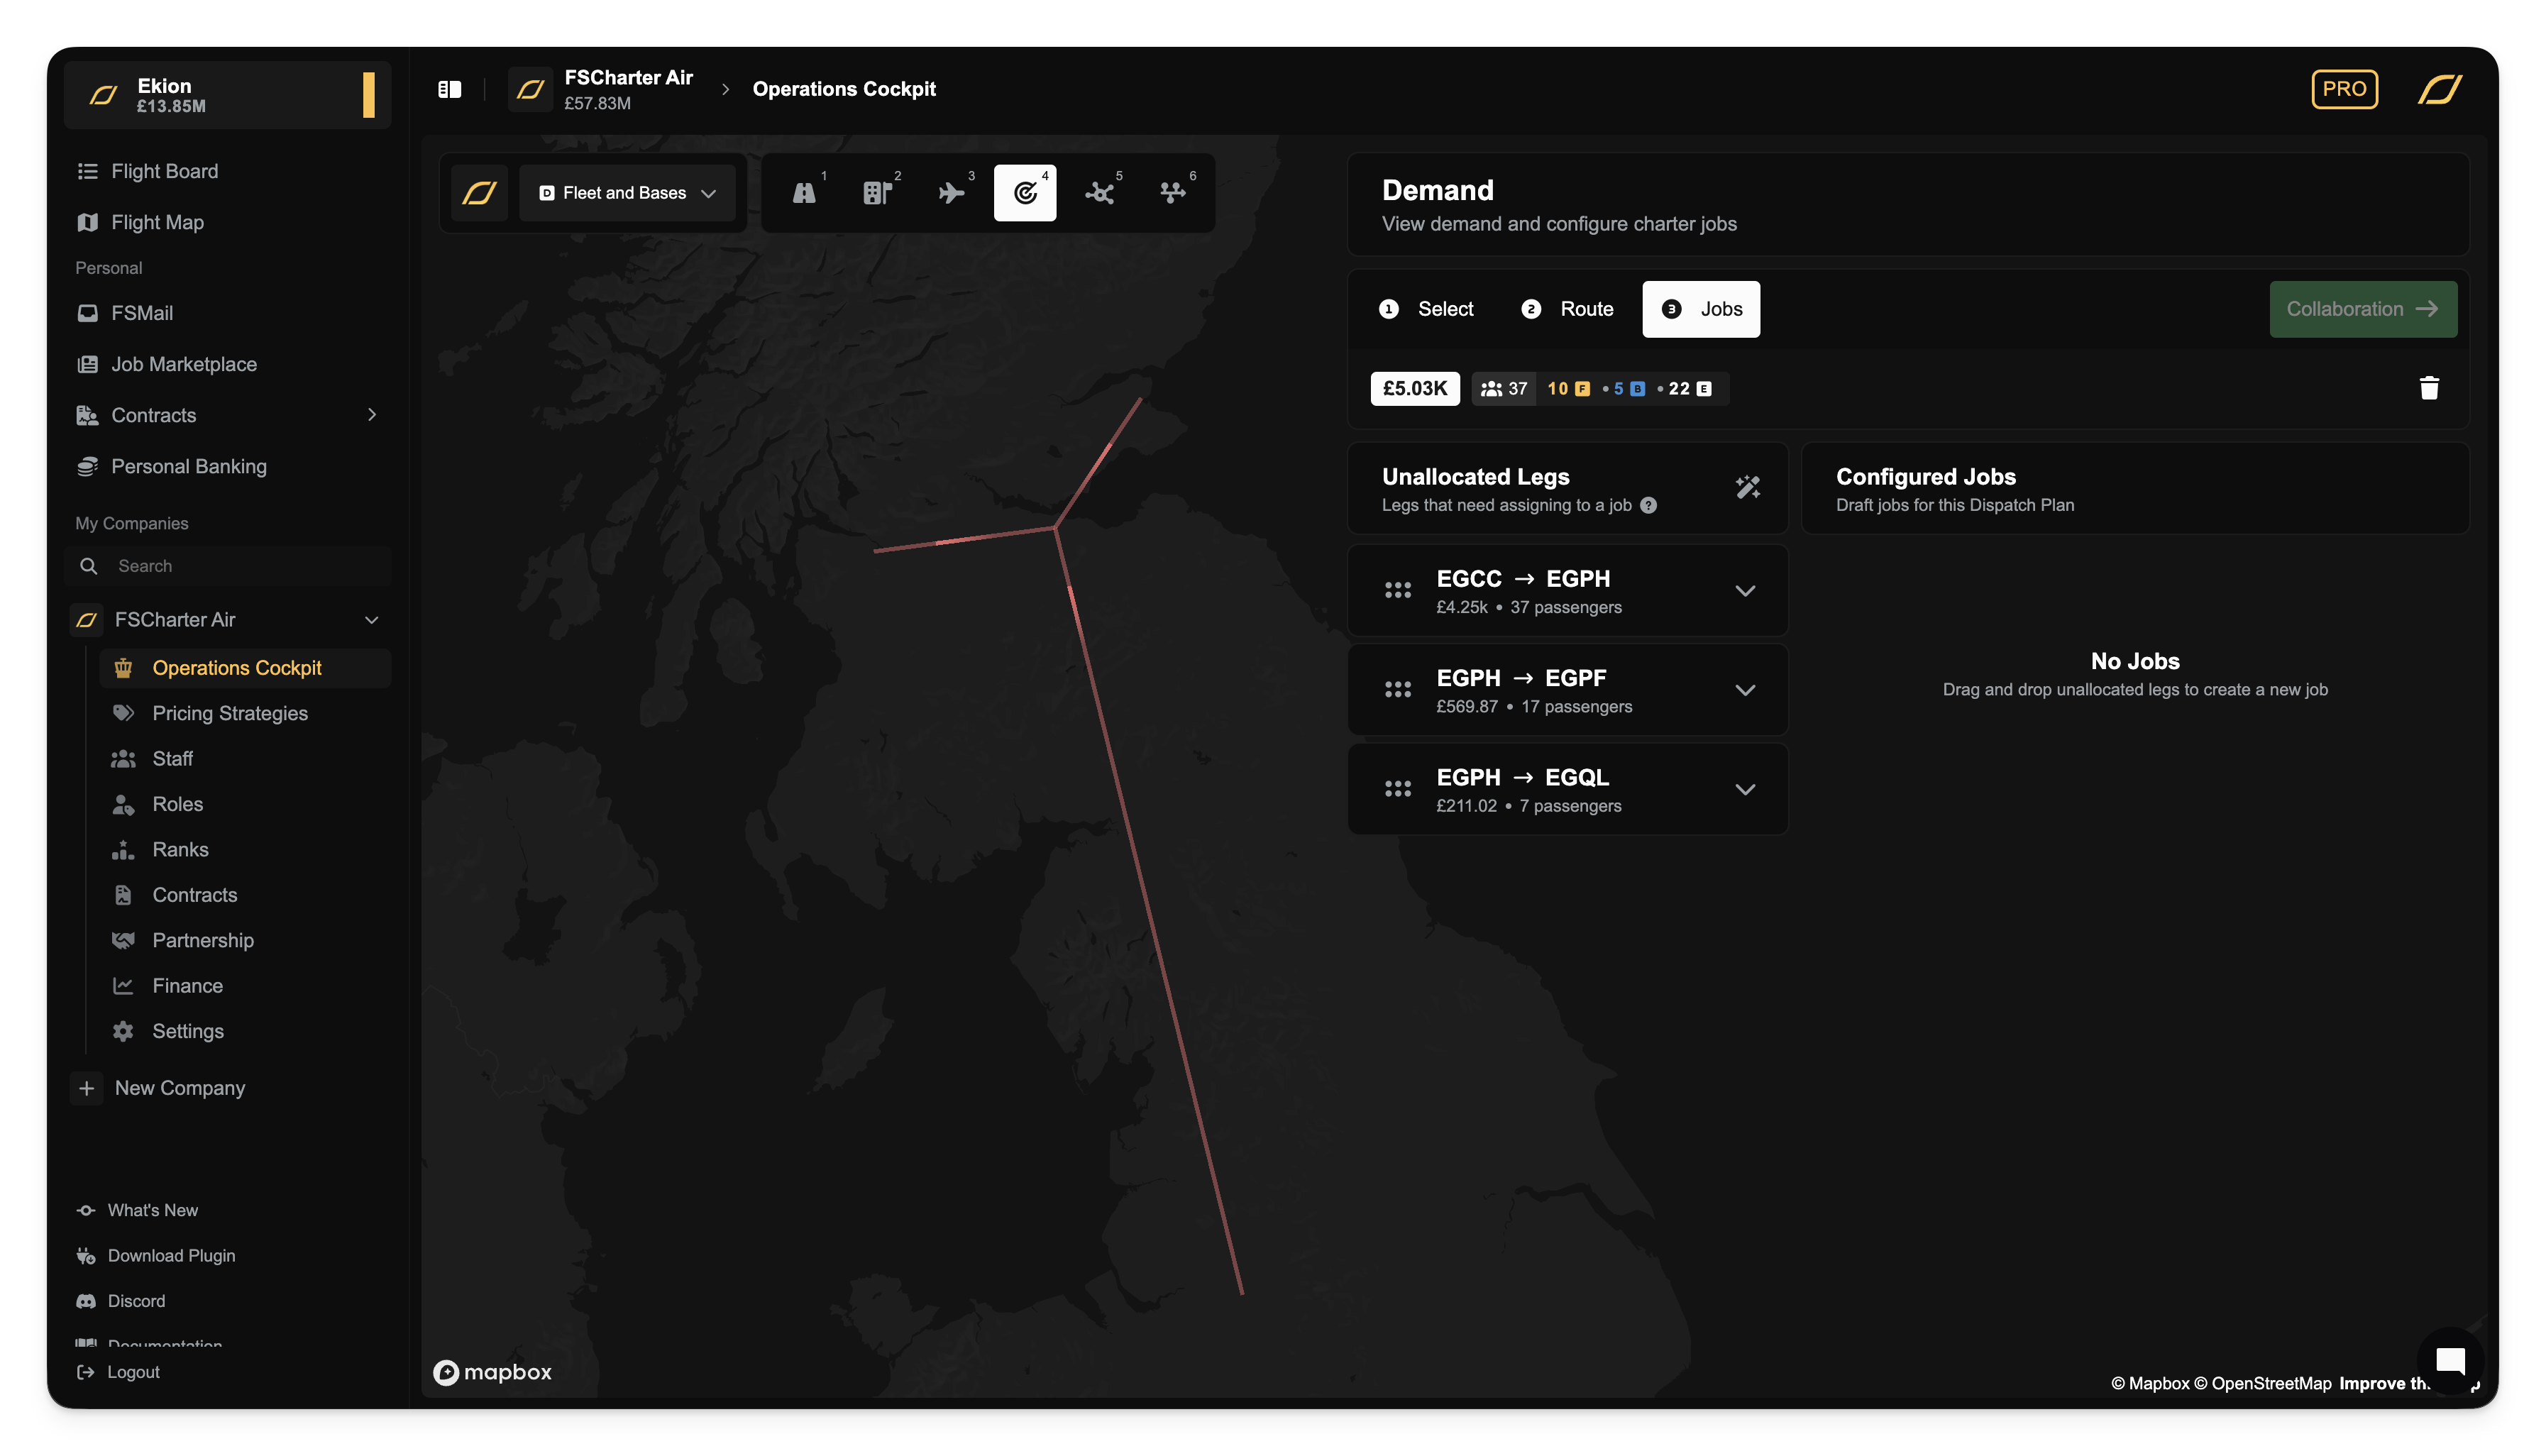
Automatically Configure Jobs
The Automatically Configure Jobs button is a helpful tool that groups connected legs into logical multi-stop jobs. This provides a sensible starting point for you to customize.
Multiple Legs and Multiple Jobs
You can group several legs into one job, meaning a single pilot must complete all of them. To do this, drag an unallocated leg from the left side. As you hover over an existing job on the right, an Add to Job box will appear. Drop the leg there to combine it. Let's make one of our jobs require a stopover at EGPH and then continue on to drop off our passengers at EGPF
It's often more economical to use different aircraft for different parts of a journey. For example, if the last leg EGPF → EGQL only has 7 passengers, you'll want to use a smaller plane, so let's do that.

When you are satisfied with the job configuration, click the red Release button. A confirmation will appear, and upon confirming, the dispatch plan will be created and made available to your pilots.
Leaving Unallocated Legs for Collaboration
If you decide not to fly a leg, you can leave it in the Unallocated Legs panel. The "Release" button will change to a green Collaboration button. Clicking this allows you to release the leg for other companies to fly. You will be prompted to choose an audience:
Public: The job is visible to all companies in FSCharter.
Internal: The job is visible only to your partner companies.
The leg will then appear in other companies' Demand lens as a collaborative opportunity.
In our example, let's suppose that we didn't want to fly the long EGCC to EGPH leg and wanted to instead focus on small hops arounf EGPH. We could leave the EGCC to EGPH leg unallocated and make that demand collaborative for another company to fulfill. Let's remove that leg from our job and release it for collaboration.
Deleting or Un-releasing Dispatch Plans
If you need to make changes after releasing a plan, you can manage it from the Dispatch Plan lens.
Un-release: Reverts the plan to a draft, allowing you to edit it again from the Demand lens. The passengers remain reserved for your company.
Delete: Cancels the plan entirely and returns the passengers to the public demand pool.
Note
A dispatch plan cannot be un-released or deleted if any of its jobs have been completed. You must complete the remaining job