Using Create Charter Mode
Create Charter Mode is a Premium Core feature that lets you start with a specific aircraft and find matching demand for it — the reverse of the standard demand-first workflow. Instead of browsing demand and then choosing an aircraft, you pick your aircraft first and the system shows you what it can fly.
While Create Charter Mode uses your selected aircraft to filter demand and shape the charter, the jobs it creates aren't exclusive to that aircraft. Think of it as a planning tool — the aircraft guides what you build, but the finished job goes to the marketplace like any other.
For the standard demand-first approach, see Creating a Charter Job. For pricing, bonus formulas, and dispatch plan details, see Charter Jobs.
What is Create Charter Mode?
Create Charter Mode is ideal when you have an aircraft sitting at an airport and want to find work for it. Rather than searching through demand and hoping to find something that fits your aircraft, Create Charter lets you:
Start with the aircraft — select it from your fleet and instantly see demand that matches its range and seat capacity
Visualise your cabin — an interactive seat map shows passengers being assigned in real time
Stay in control — filter sync keeps demand results matched to your remaining seats as you fill them
It complements the standard demand-first workflow covered in Creating a Charter Job. Use whichever fits your workflow: if you're looking at the map and spot interesting demand, use the demand-first flow. If you have an idle aircraft and want to put it to work, use the Create Charter Mode.
Entering Create Charter Mode
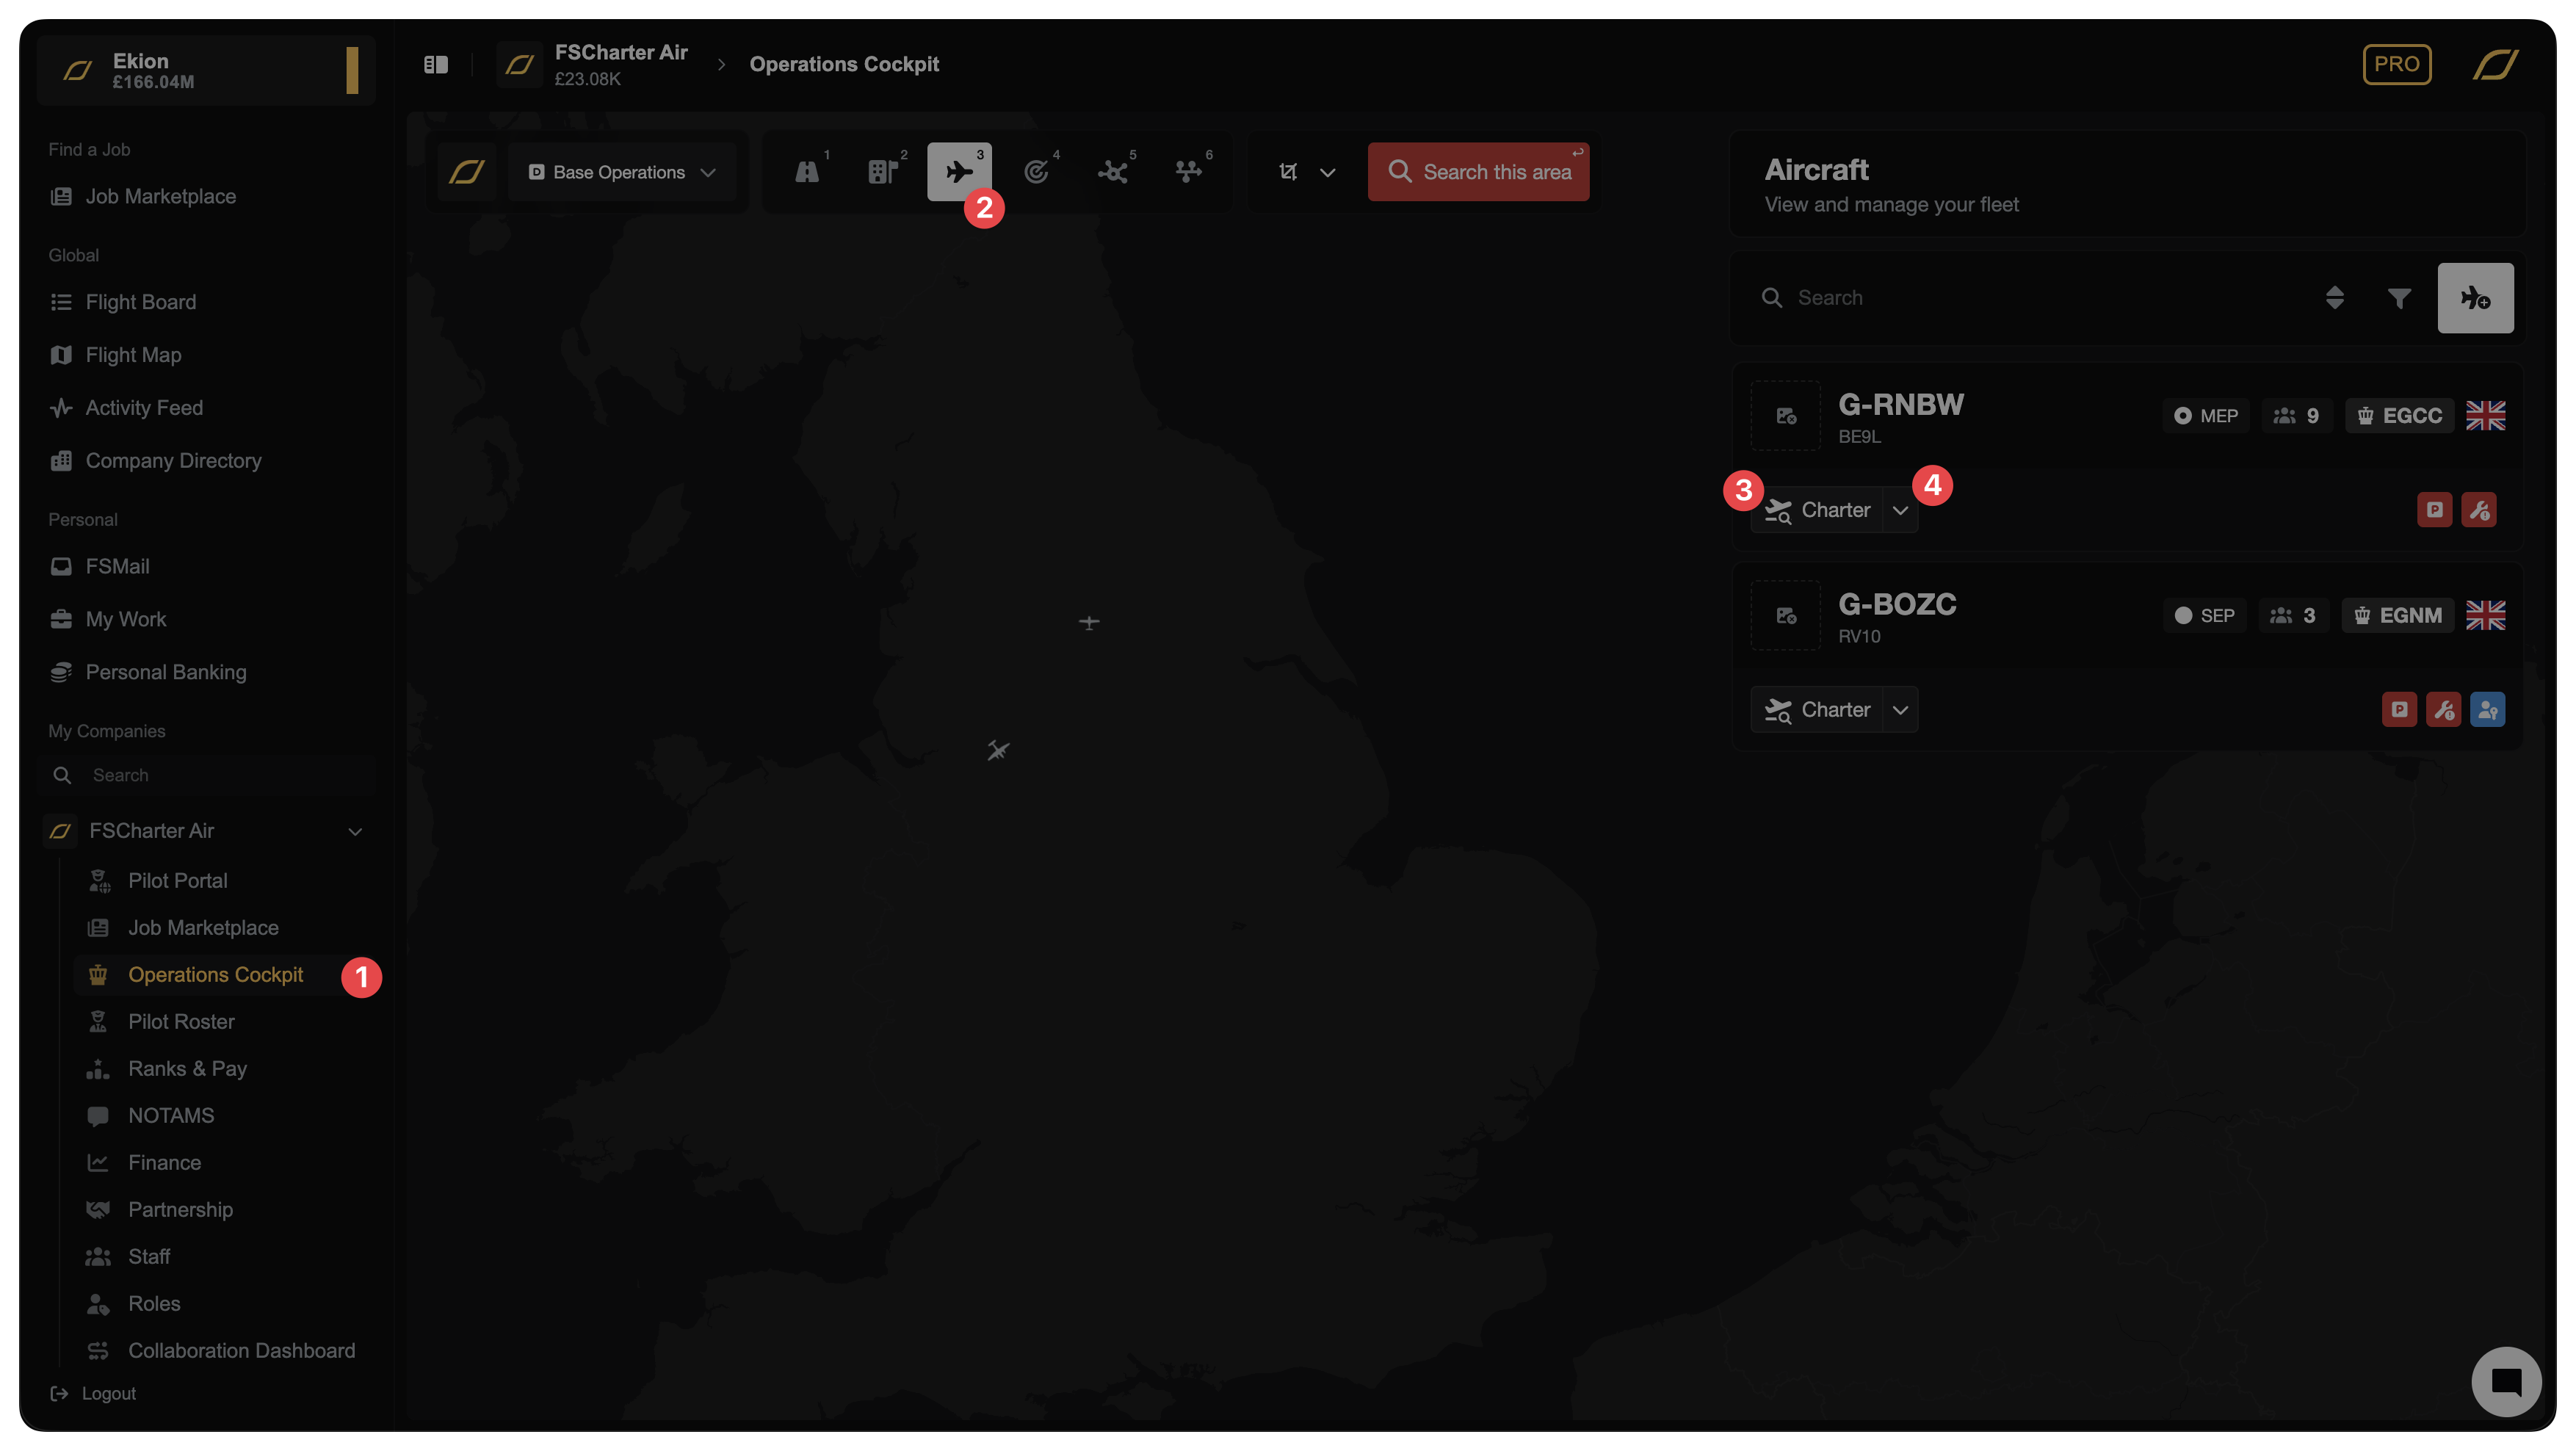
To enter Create Charter Mode, go to the Operations Cockpit 1 and activate the Aircraft lens 2.
Each charter-eligible aircraft row has a split button on the right:
Charter 3 (primary action) — opens Create Charter Mode for that aircraft
Ferry 4 (dropdown) — creates a ferry (empty repositioning) flight instead
Click Charter on the aircraft you want to fly. This opens the Create Charter panel with your aircraft pre-selected.
Tip: You can also enter Create Charter Mode from the Demand Lens, where you'll first be prompted to select an aircraft.
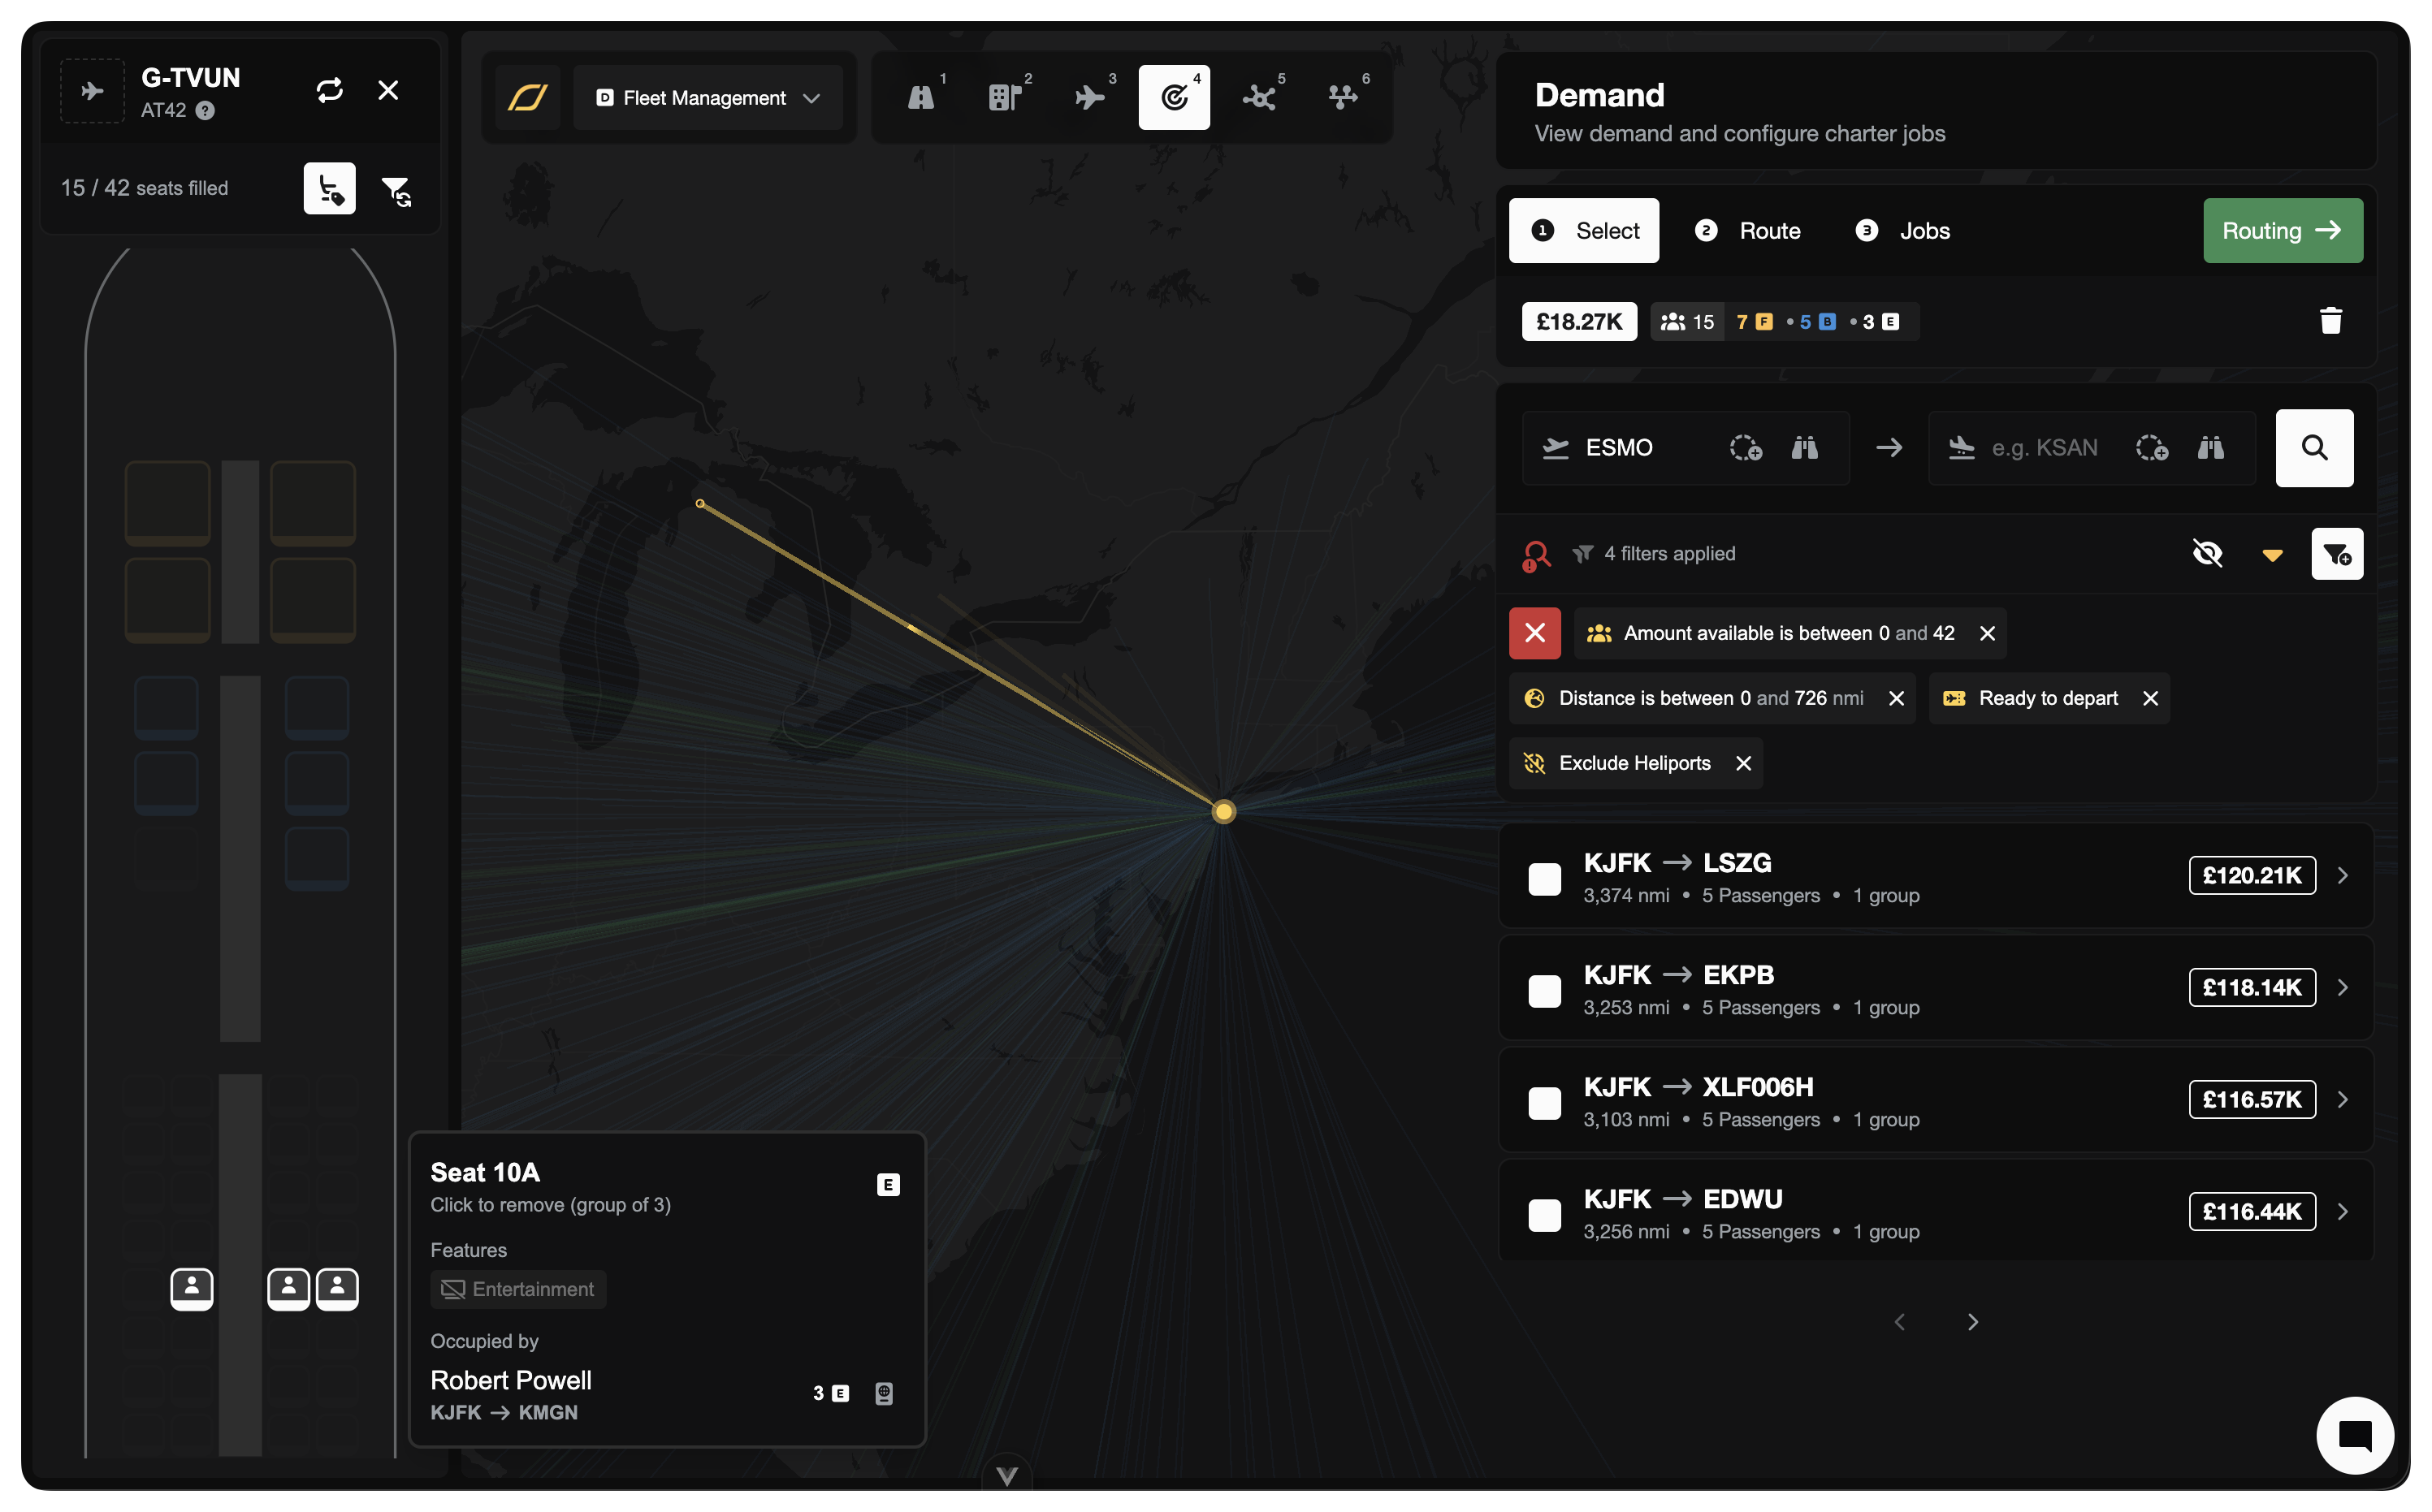
The Seat Map
Once you enter Create Charter Mode, you'll see an interactive seat map of your aircraft's cabin layout in the panel header.
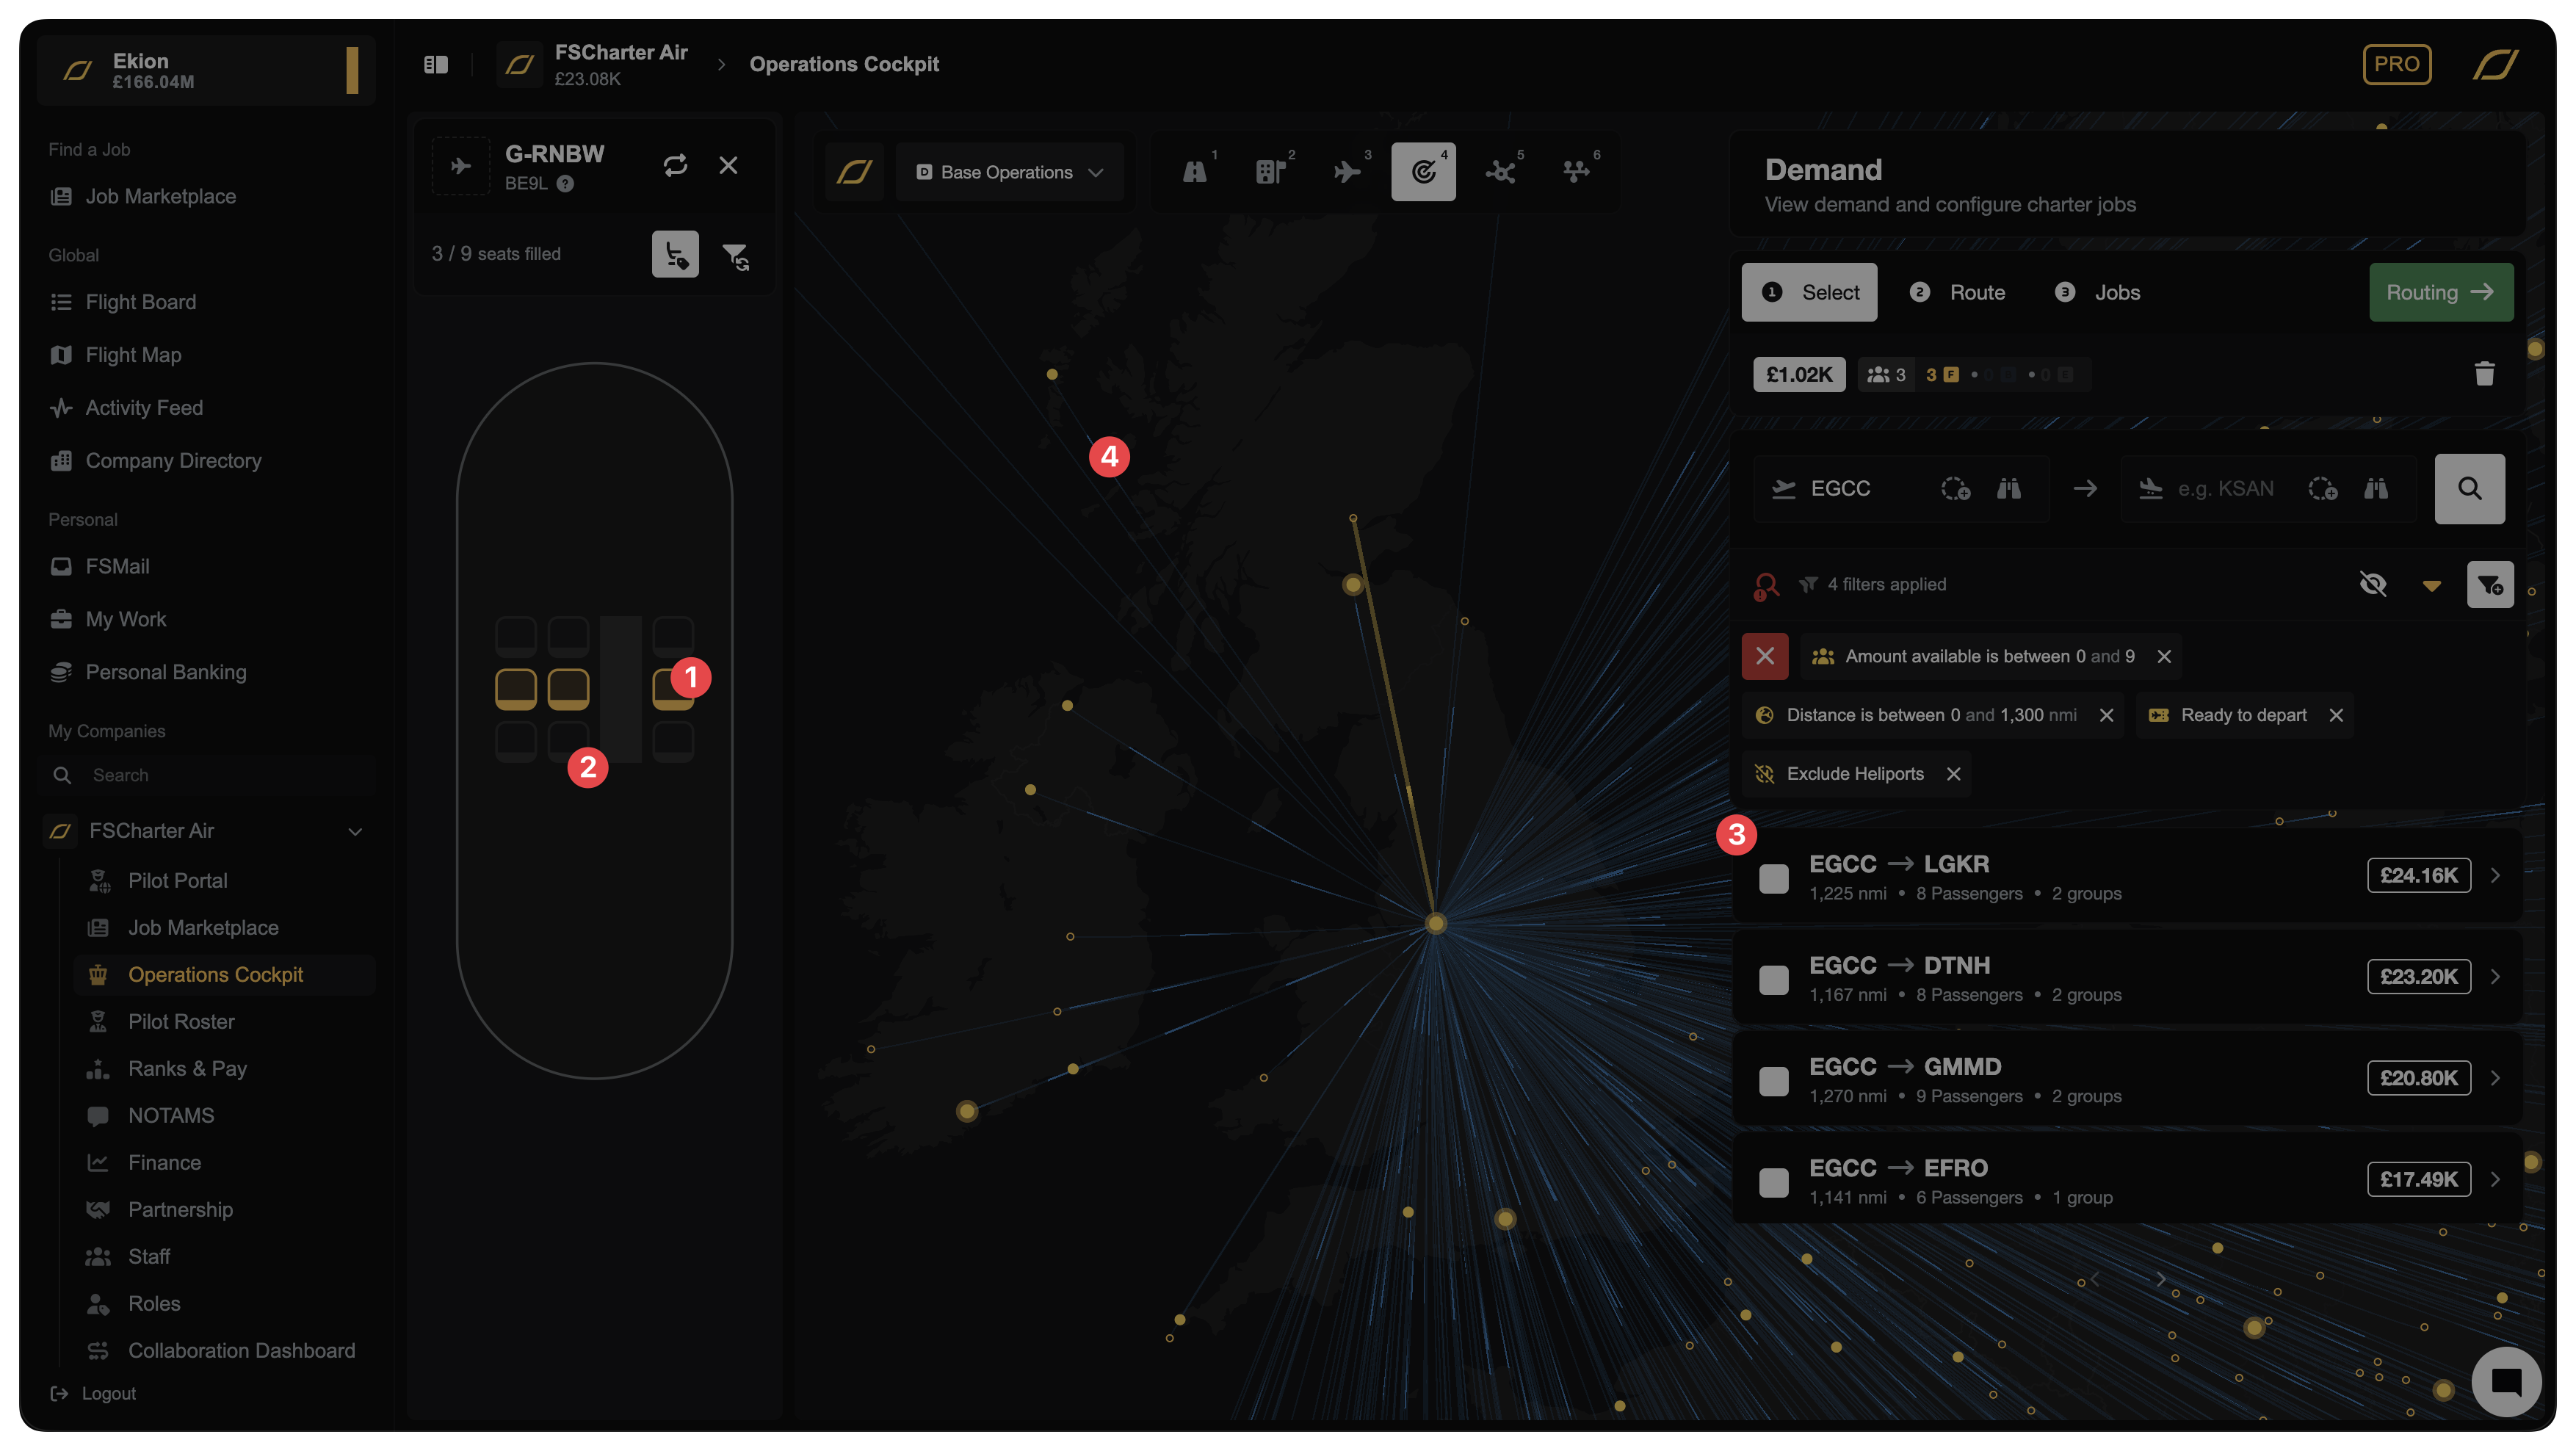
The seat map shows:
Occupied seats 1 — highlighted in colour, representing passengers you've selected from the demand list
Empty seats 2 — available capacity remaining
Class sections — seats are grouped by cabin class (Economy, Business, First) matching your aircraft's current configuration
As you select demand groups from the list 3 (or by Ctrl/Cmd clicking on them on the map 4, passengers appear on the seat map in real time. You can:
Click a filled seat to remove that passenger/group from your selection
See at a glance how full the cabin is and which classes have space
Tip: You can reconfigure your aircraft's cabin layout free of charge before chartering. If your current seat configuration doesn't match the demand you're seeing, consider adjusting it first.
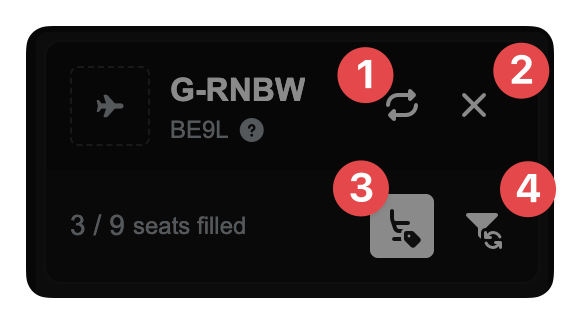
Above the seat map are a set of controls that allow you to:
Change the aircraft 1
Exit Create Charter Mode 2
Toggle seat details on hover 3 (useful when the hover cards get in the way of the map)
Toggle Filter Sync 4 to avoid overfilling (continuously filters the available demand to only groups that will still fit in the remaining seats of your aircraft).
Searching for Demand
On the right, the Select tab shows available demand filtered to your aircraft. The system automatically limits results to demand that:
Departs from your aircraft's current airport (or within range, depending on settings)
Falls within your aircraft's range
Fits your available seat capacity
Each demand row shows:
Route — origin and destination airports
Passengers — number of passengers and their class (Economy, Business, First)
Revenue — estimated earnings for this group (including any bonuses)
Filter Sync
The Filter Sync toggle 4 (disabled by default) automatically adjusts the demand filters as you select passengers. For example:
Your aircraft has 19 seats
You select a group of 12 economy passengers
Filter Sync automatically updates the demand list to only show groups of 7 or fewer — matching your remaining capacity
This prevents overfilling and helps you efficiently pack the cabin. You can toggle Filter Sync on or off depending if you want to browse all available demand regardless of remaining capacity.
Selecting Demand
Click on a demand row to see all demand on that route. Select the checkbox next to the row or the group to add those passengers to your charter. They'll immediately appear on the seat map above. You can select multiple demand groups to fill the aircraft.
You can Ctrl/Cmd-click on any blue/green demand line on the map to also add the demand to your charter. Ctrl/Cmd-clicking on an already added demand group will remove them.
To remove a group, either:
Click the filled seats on the seat map
Click the selected demand row again to deselect it
Ctrl/Cmd-click on the yellow line on the map
Routing
Once you've selected your passengers, switch to the Route tab. This shows the route your aircraft will fly, based on the demand you've selected.
If your selected demand involves multiple destinations, the routing tab lets you:
Review the planned legs
Drag the yellow lines on the map to re-reoute legs
See distance and estimated flight time for each leg
Creating Jobs
Switch to the Jobs tab to configure and create your charter jobs.
From here you can:
Review the jobs that will be created from your routing
Preview job financials
Adjust job settings
Add or drop legs between jobs manually
Leave legs unallocated for collaboration (see Creating a Charter Job for details on collaborative charters)
Releasing and Accepting
When your jobs are configured, you have two release options:
Release — publishes all jobs to the Job Marketplace for any qualified pilot to accept
Release & Accept — a shortcut available when there is exactly one job departing from the aircraft's current airport. This releases the job and immediately accepts it with you as the pilot.
After releasing, Create Charter Mode exits automatically and you're returned to the Operations Cockpit.
Tips and Best Practices
Use Filter Sync to avoid overfilling — especially useful when incrementally building a charter across multiple demand groups
Check the seat map for class distribution — mixing passenger classes affects the charter bonus. Fewer total passengers means a higher per-person bonus (see Charter Jobs for bonus formulas)
Keep groups small (1–40 passengers) for maximum charter bonus. Once you exceed 40 passengers, a capacity penalty applies
Reposition first if needed — use the Ferry option from the split button to move your aircraft to a higher-demand airport before chartering
Switch aircraft mid-flow — if you realise a different aircraft would be better, use the Switch Aircraft button without losing your selected demand